

James Bond Aston Martin DB5 (10262): the gadgets are the build
This is not a Technic set, and I want to be straight about that before it comes to you. The Aston Martin DB5 is a Creator Expert car, built mostly from ordinary bricks over a Technic chassis, in the same family as the Ferrari F40 and the Volkswagen Beetle. What earns it a place in a Technic library is what goes on underneath: an ejector seat, machine guns behind the headlights, a bullet shield behind the rear window, all worked by hand through Technic linkages that you assemble in the first bags and only understand at the end.
It is in the Brick Club library. Below is what each gadget does and how it is driven, how the four groups of bags split the build, and the points where the reviewers had to stop and wiggle something.

Why this one is worth an evening or three
Mike Psiaki designed it, and whatever the reviews think of the shape they agree on one thing: the mechanisms are the point. Brickset’s reviewer noticed that the Technic assemblies are often left unfinished over several pages of the manual and their purpose only becomes clear late on. That is the shape of the whole build. You clip a red connecting rod to the gear lever in the first bag and it does nothing at all until bag three, when it finally reaches the headlights.
The manual is dressed as an MI6 file: a manila cover, a ‘For Your Eyes Only’ band, text in English and French, and a few pages inside that show cutaway drawings of each hidden gadget before you build it. Seventeen stickers, nearly half of them for the revolving number plates. Twelve bags numbered one to four, three to a group, plus an unnumbered bag with the four tyres and one long Technic piece.
Be warned about the looks. Four of the reviews complained about the shape, and Jay’s Brick Blog called it ugly. The car is light grey rather than Silver Birch, and the rear deck of the real DB5 has come out flat. New Elementary’s reviewer had the same reservation and still rated it one of the most ingenious LEGO designs he had come across, having learned to love it through the build. That is my reading too. It is a set you build to find out how it works, not one you build to photograph.
What it actually does
Everything is worked by hand and every control is disguised as part of the car: an exhaust tip, the gear lever, the rear bumper. Nothing is motorised, and the only things that need swapping by hand are the tyre scythes.
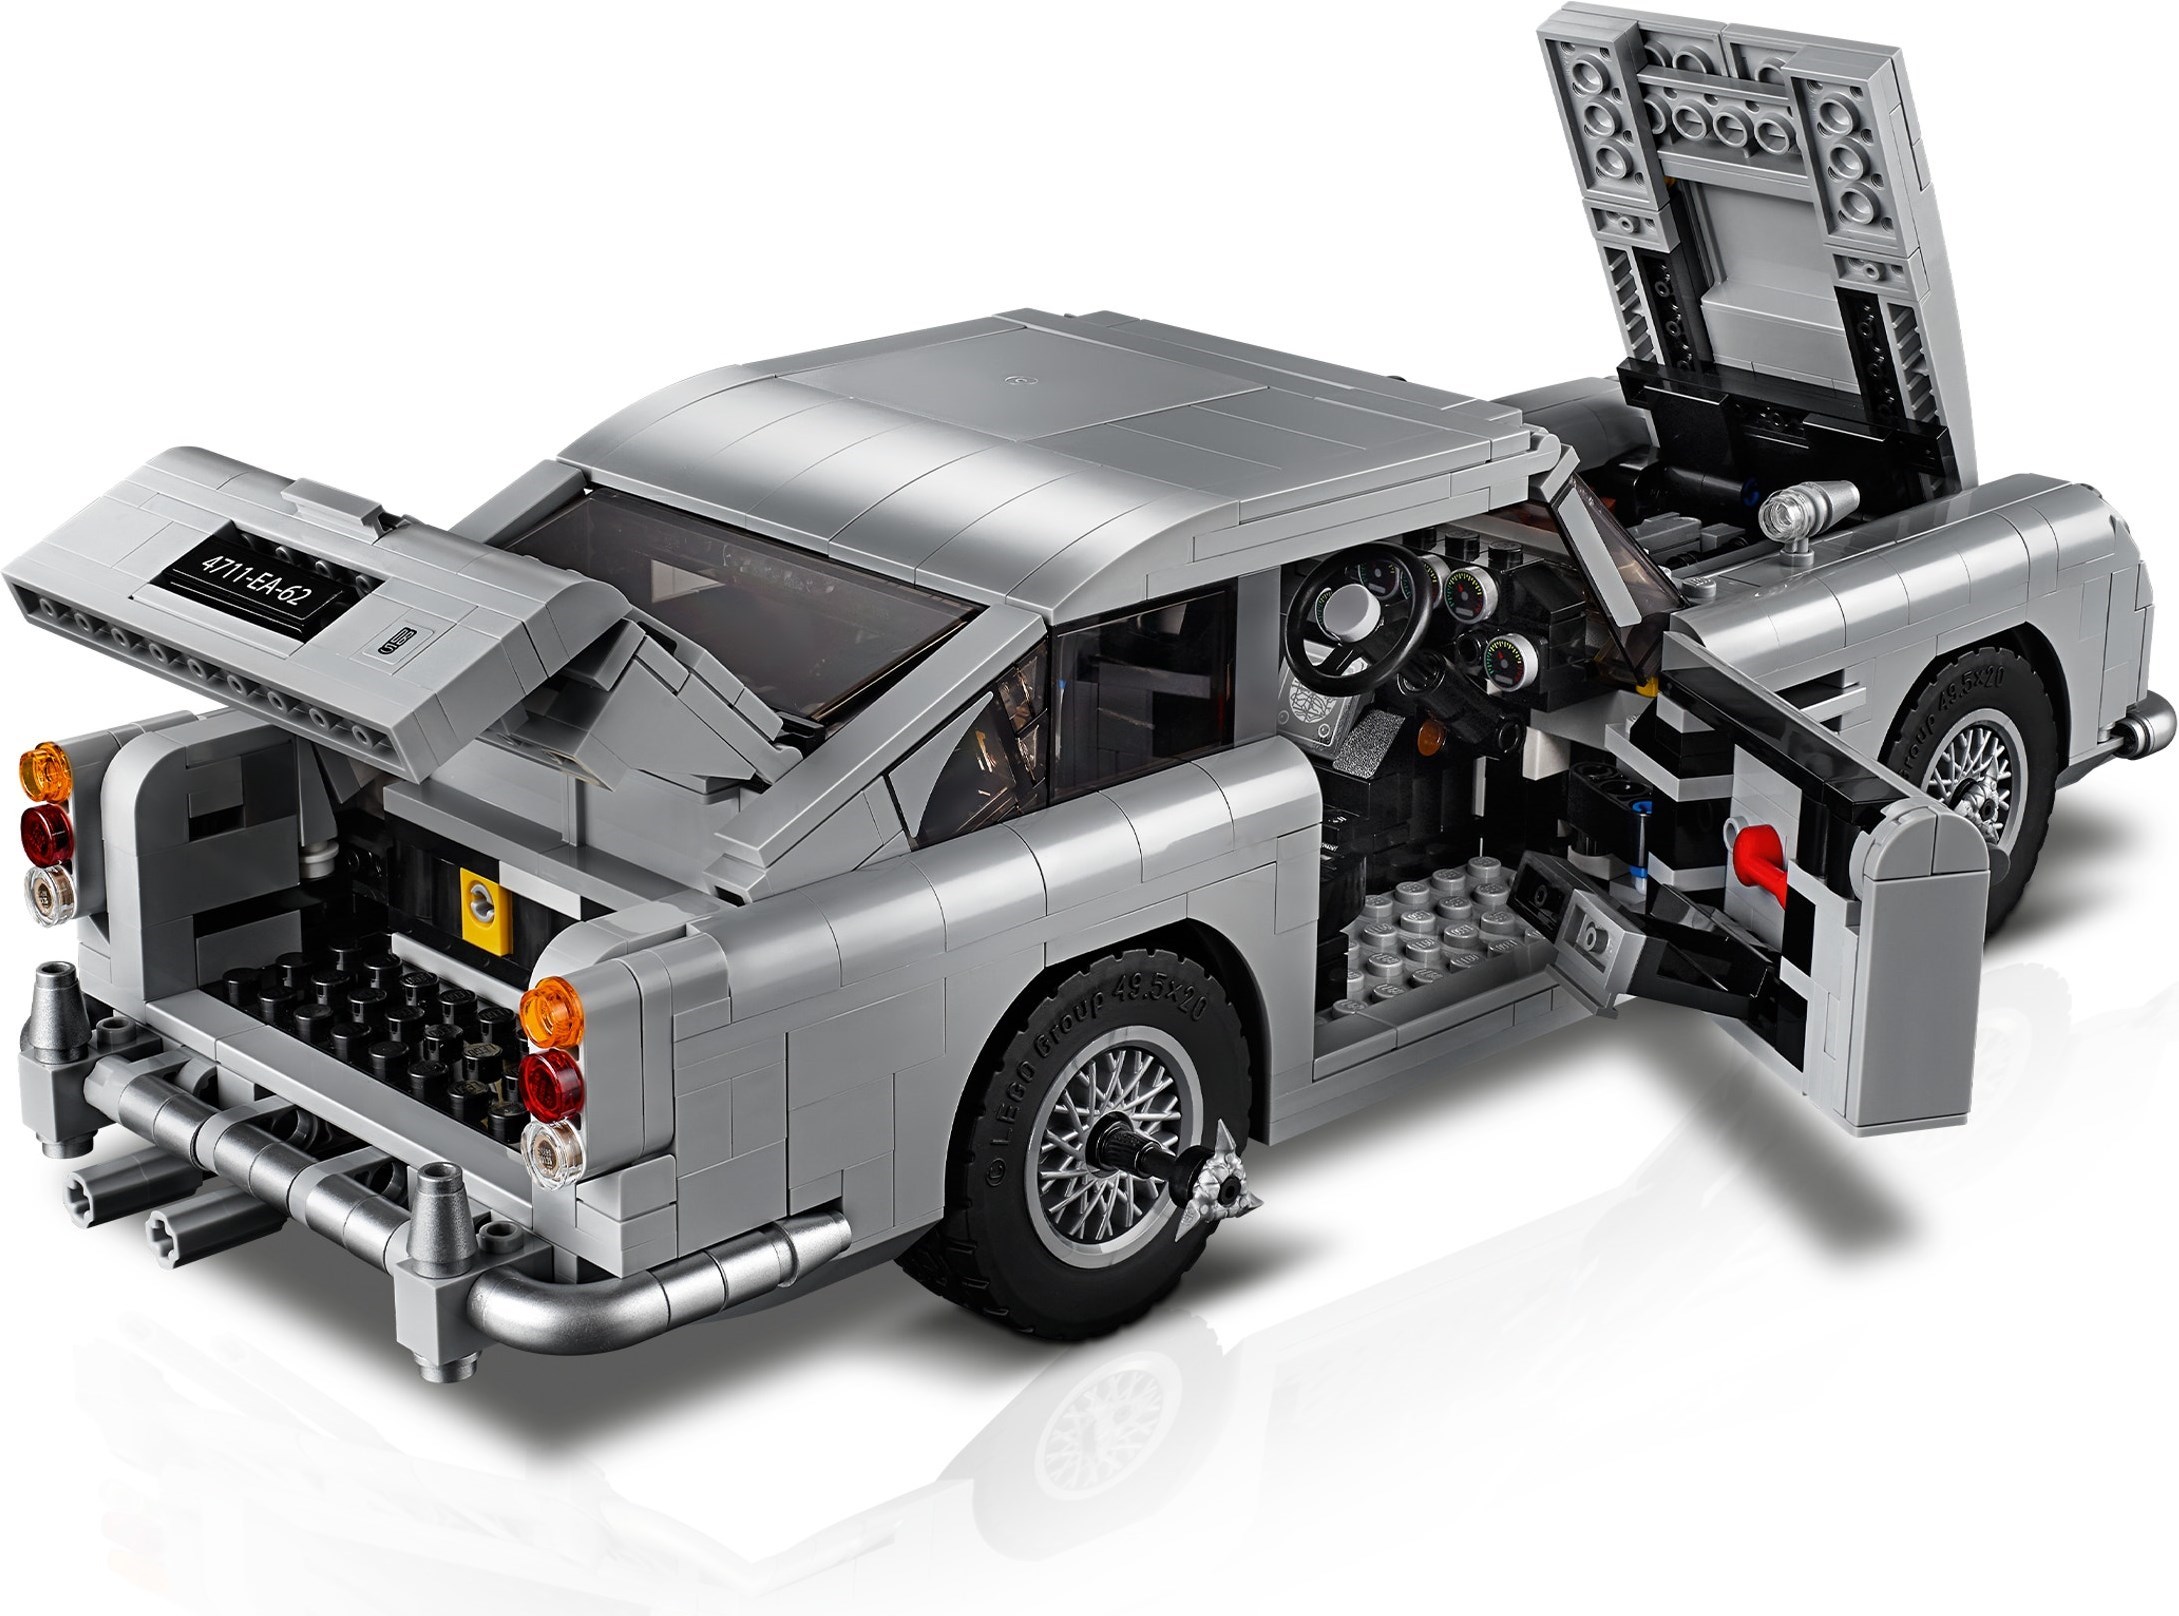
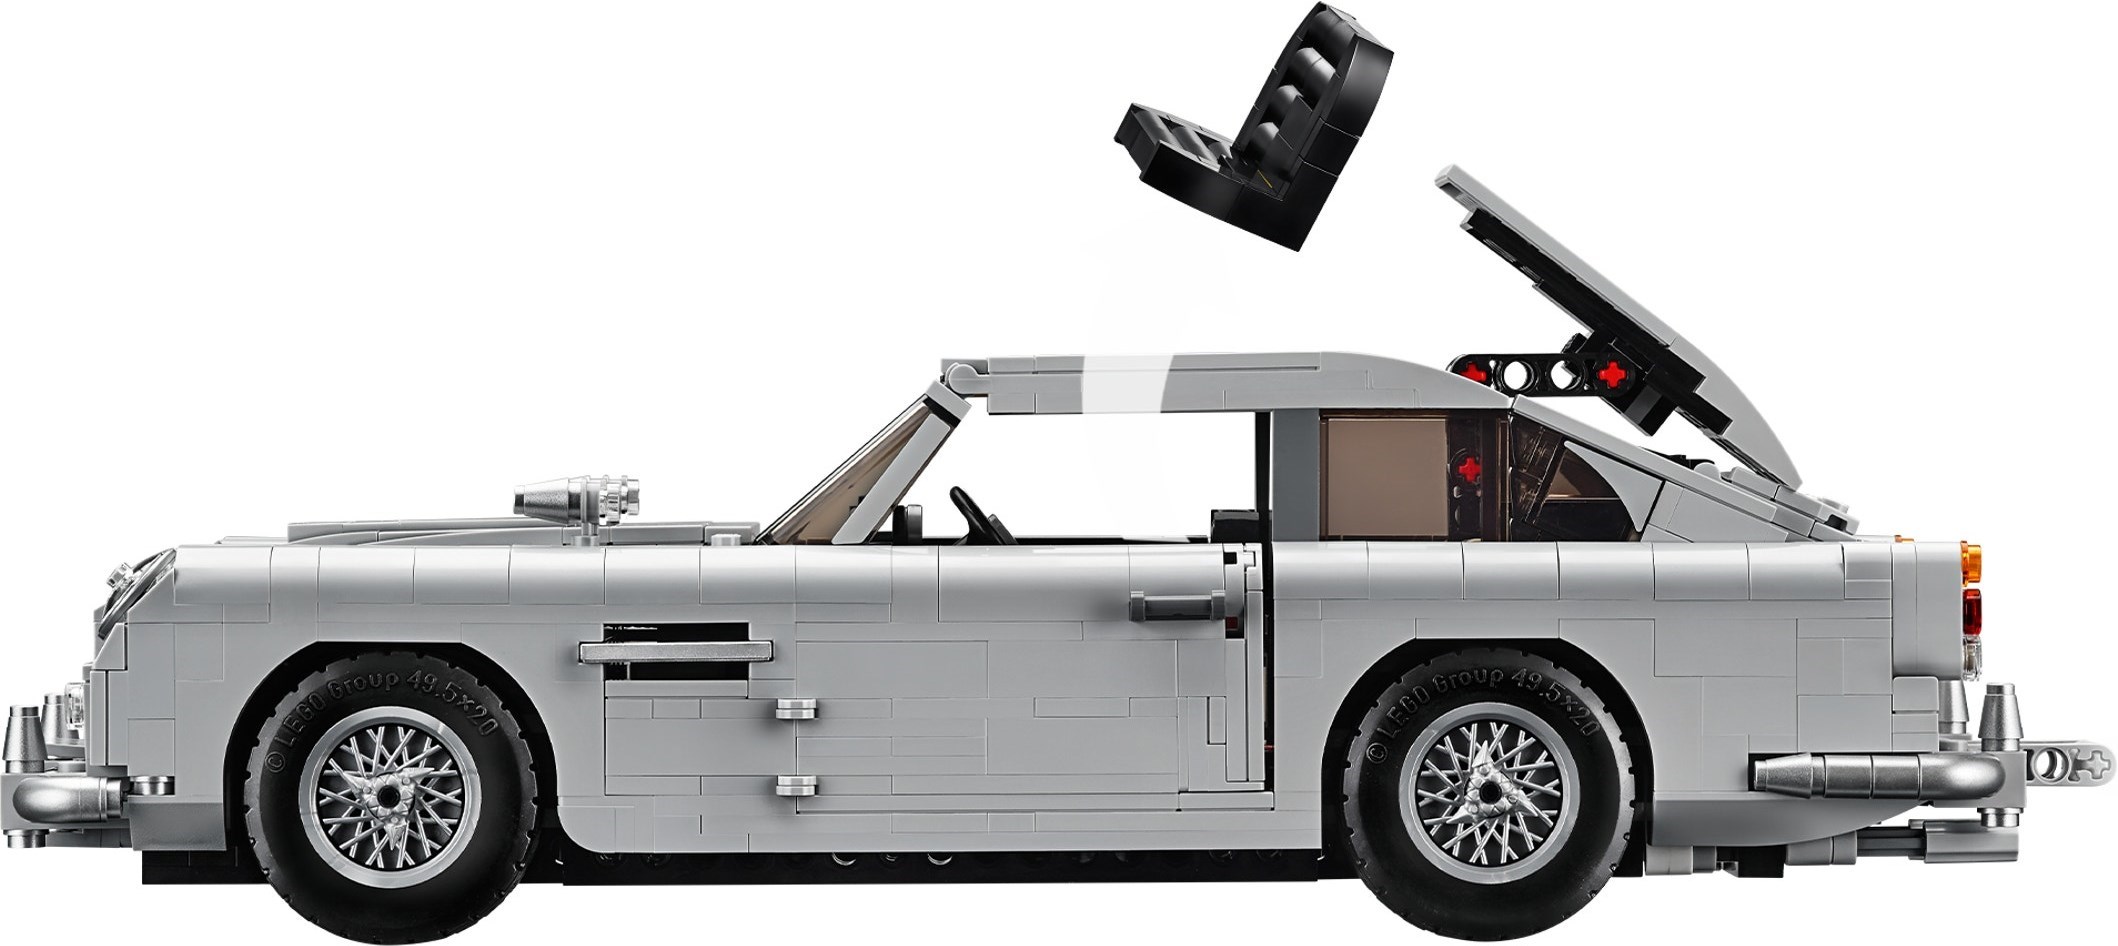
Pull the centre section of the rear bumper. A linkage runs forward through the chassis and the roof panel above the passenger seat hinges open; the same pull loads the rubber bands under the seat. Let the bumper go (Brickset says release it, The Brick Fan says push it back in, either way it is the return stroke) and the seat fires a few centimetres up through the open hatch, about the height Goldfinger’s henchman managed in the film. The seat sits on a red Technic axle that holds it until the liftarms beneath it spring upwards. The mechanism fills most of the space behind the front seats.
The gear lever beside the driver carries a red round tile for the button. Pull it back and a long axle running forward from the gear lever to the nose rotates the headlight assembly downwards, so the lights drop out of sight and the two guns fixed behind them take their place. Brickset’s reviewer worried during the build that a linkage this long would be unreliable and found it worked perfectly. The Brick Fan had the same worry and the same result.
A screen rises between the boot lid and the rear window. It is driven by twisting the innermost exhaust tip under the rear bumper, which turns a grey liftarm inside the chassis that you fitted in the very first bag. The reviews disagree on how well it runs. Brickset called the motion remarkably smooth but found the exhaust awkward to grip because it barely protrudes; The Brick Fan said the screen tends to catch in its slot and needs a wiggle to free it. Expect something between the two.
Both plates are turned by hand. Each is a 1x1x3 brick with a sticker on all four sides, held between two grey chair pieces so it has room to spin. Four faces rather than the film’s three, because there is no flat-sided triangular brick: BMT 216A for the UK, 4711-EA-62 for France, LU 6789 for Switzerland, and JB-007 from the promotional shots.
These do not deploy. You pull the silver shuriken hub off the wheel, push in one of the two black telescope pieces kept in the boot, and put the shuriken back on the end. Fitted, they look right. Just do not expect a lever.
A black gear on the passenger side of the centre console flips the vent panel round to show the radar scanner Bond uses to follow Goldfinger’s Rolls-Royce. The driver’s door has a compartment that opens on a bright red radio telephone, a gadget the film car had fitted but never showed on screen.
The bonnet sits flush in the nose, which normally forces a visible gap so the hinge has room to swing. Here it is double-hinged on two Technic liftarms that give it just enough travel to open cleanly, and the engine underneath lifts out. The doors open on two hinged plates with a Technic liftarm inside acting as a check strap. The boot lid is two sections joined by click hinges and there is real space inside it.
How the build goes
Four groups of numbered bags, with a cutaway drawing of the next gadget at the start of each mechanical section. None of the reviews gives an hour count; going by the piece count, allow two evenings, three if you test as you go.
Chassis and the ejector mechanism
Almost all Technic. A red connecting rod goes onto the gear lever and one of the exhausts is fitted so that turning it moves a grey liftarm; neither does anything yet. Then the ejector seat launcher, built in bright colours so you can follow it, with the rubber bands. Work the bumper pull now, while you can still see it, and check the roof-hatch flipper moves freely.
Doors, rear sides and interior
The doors hang on steering knuckle arms and brackets, the rear quarters go on and the interior goes in. The dashboard panel in front of the console sits at about 45 degrees on clips top and bottom, a technique Brickset’s reviewer had not met before. The telephone compartment goes into the driver’s door here.
Nose, engine and the gun linkage
The rod from bag one is finally connected to the headlight assembly. The side vents are a silver tile on a clip, the mirrors sit on inkwell pieces, and the grille is seven printed silver tiles that slot between two 1×3 arches without a stud holding them. The engine uses hinges for the angled cylinder banks. The headlights go on white droid arms and feel loose until the bodywork closes round them.
Roof, windows, bonnet and boot
The bonnet is one removable section. The rear window is a single 2x10x3 trans-black windscreen fitted sideways on four clips, and the rear side windows are angled to meet it with small stickers finishing the curve. The boot is two halves on click hinges. Last, the roof: the front windscreen supports its corners on 1×1 clips and the opening panel is anchored to the ejector mechanism from bag one. Only now does the whole thing work.
No member diaries for this one yet, so these come from the reviews rather than from our own returns.
- The ejector linkage may stick at first. The Brothers Brick found the chain of Technic connections needed poking and prodding before something settled and the roof opened cleanly. Work it a few times before you decide something is built wrong.
- The bullet shield can catch. The Brick Fan had to wiggle it free; Brickset found the exhaust tip hard to twist because it barely protrudes. Turn it gently, from directly behind the car.
- Stickers on transparent parts. The bars on the front and rear windscreens are stickers on clear pieces. The Brothers Brick managed them without bubbles; apply them with the part flat and off the model.
- Headlights and grille feel loose until the end. The grille is held only by the arches either side and the headlights sit on droid arms. Both firm up once the body closes round them, so do not force anything in the meantime.
- Bright parts show through the rear window. The ejector mechanism is built in colour so it is easy to follow, and some of it stays visible from above through the rear glass. Nothing to fix, just know it before you photograph the car.
On the shelf
It is 34 cm long, 12 cm wide and 10 cm tall, noticeably bigger than the Ferrari F40 (10248) from the same series even though the real cars are much the same length; Brickset’s reviewer reckoned the scale went up to make room for the gadgets. The body is light grey with metallic silver bumpers, wire wheel inserts (the only new mould in the set) and a printed grille. The curved 1×2 brick that first appeared in the Roller Coaster (10261) was made for this car, and there are 44 of them along the sides and bonnet.
Seen low and from the front three-quarter it is convincing. From behind, less so: the rear deck is flat where the real car curves. From above, the rear window shows the coloured Technic beneath. Leave the roof hatch closed and the scythes in the boot for display.

This is the one for you if you want a build where the mechanisms are the story rather than the shape. It suits a member who has done a couple of the big Technic cars and fancies something shorter with more surprises per bag, and it suits Bond fans who would not otherwise touch a Technic set. Two evenings, maybe three. Test the bumper pull at the end of bag one and again before the roof goes on, and go easy on that exhaust tip.
If you like this one, try
The other film and display sets in the library that are not Technic. The ECTO-1 and the two Batmobiles have the same mix of brick bodywork over a mechanical core; the Lunar Lander is the shortest build of the four.


The Aston Martin DB5 is in the library
Technic Fan gets up to 6 kits a year, Master Builder up to 12. Delivery both ways is included and the prepaid return label is in the box.