

Forest Harvester (42080): a motor that pumps air
Most motorised Technic sets put the motor on a gear train. This one puts it on a compressor. A Power Functions battery box and motor sit in the back of the machine and do nothing but pump air, and the air is what raises the boom and closes the grab. You control it with two small valve dials behind the cab, so the work is done by the motor but the deciding is still done by hand. It is the Pneumatic System V2 with Power Functions behind it, and there are not many sets that do this.
It came out on 1 August 2018 at £119.99 for 1,003 parts, sold as Forest Machine on the box and listed as Forest Harvester on Brickset. It is in the Brick Club library, one member has built it and sent a photo, and below is what each control does, how the three numbered sections split the build, and where the two reviewers I could find had to backtrack.

Why this one is worth an evening or three
Pneumatics had been in Technic for decades, but almost always with a hand pump. Here LEGO’s own description says you activate the Power Functions motor and engage the pneumatic system to operate the motorised boom and grabber. In practice the battery box powers a compressor, the compressor feeds two valves, and the two valves feed the cylinders. Adam White at BricksFanz thought the combination of pneumatics and Power Functions was fun but a little bit of overkill for what it actually powers, and he is not wrong. It is still the reason to have this set sent: you get to see a motorised air system built from scratch, and it is a smaller commitment than the trucks and cranes that normally carry one.
The other unusual thing is the layout. Adam noted that most Technic sets start with a complex chassis base, whereas this one splits into three clear sections, the rear, the front cab and the boom arm, and the chassis turns out to be the easiest part. The tricky work is in the cab, where the valves live, and in the harvester head at the end of the boom.
Brickset’s members give it 3.8 out of 5 from 99 ratings, which is middling for Technic. Amy Alphin at Brick Architect, building it as her first ever Technic set, rated it 4 out of 5. It is not a showpiece, it is a working demonstration.
What it actually does
Two of the functions run on air from the motor. The rest are gear dials and turntables you work by hand. There is no gearbox and no remote control, which Adam noted with some regret.
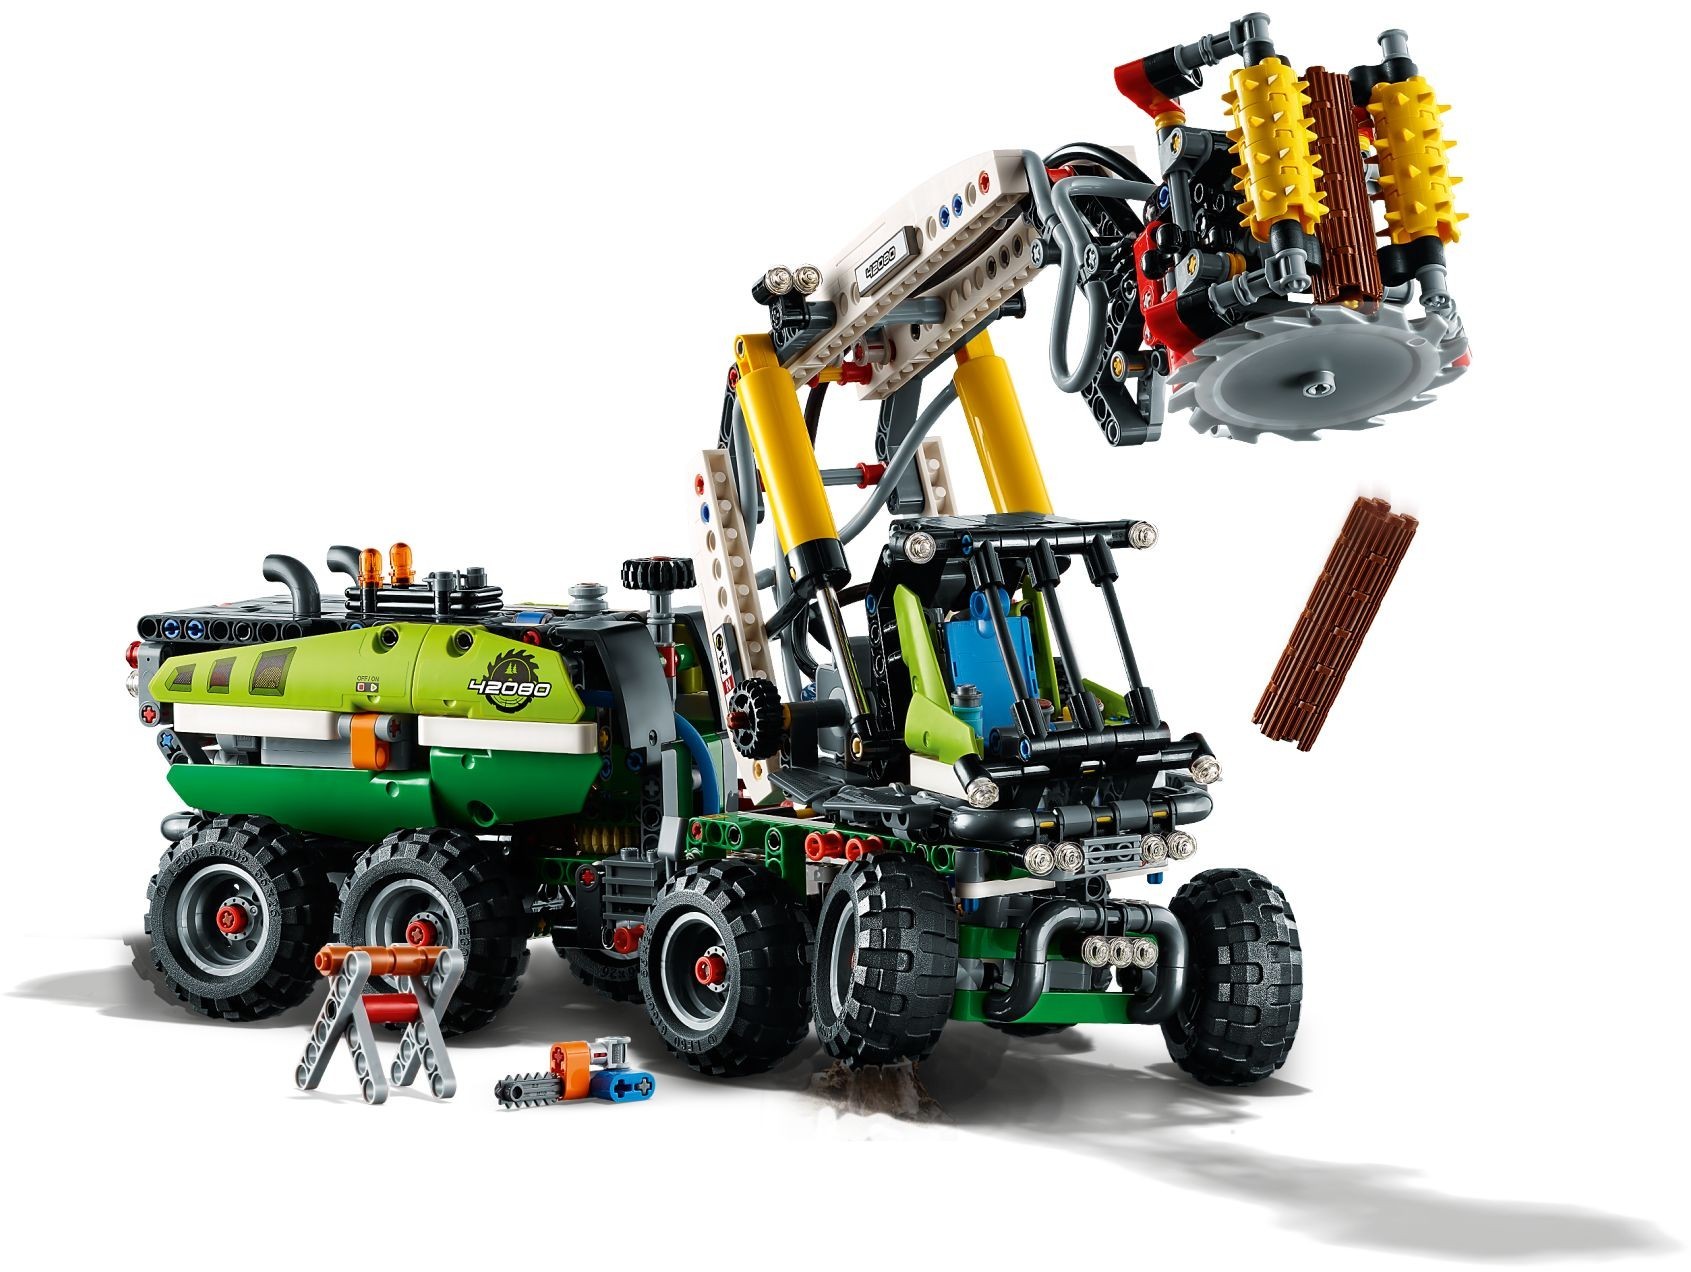
Switch the battery box on and the motor starts pumping. Adam describes it plainly: switch the power on, then open the air with a couple of gear dials at the rear of the cab, and the boom rises or lowers depending on which way you turn. The boom is carried on the two yellow cylinders you can see either side of it in LEGO’s pictures.
The second dial sits on the other side of the cab and works the grab at the end of the boom. Adam: with the other on the opposite side, making the mean looking grabber open and close. Amy calls it the debarking mechanism and says it opens and closes around a log. The two brick-built logs are what it is for; get one into the jaws, lift it on the boom and swing it round to the little log rack on the back.
LEGO calls it a multidirectional harvester head with a spinnable cutter blade. The head rotates on the end of the boom and can be angled two different ways, and Adam says the angle is set from another gear dial rather than by air. The saw is not powered. Adam again: the blade has no powered movement but spins by hand, and with the log positioned just right you can slice it in two. The yellow spiked feed rollers on the grab do not turn either, which he thought a shame. So the head is two pneumatic jaws plus a geared tilt, and everything else on it is hand-operated theatre.
The cab and the boom sit together on a large turntable, so turning the cab swings the whole boom with it. How far it goes depends on who you read: LEGO says more than 180 degrees, Adam says around 180, Amy says almost 360. It turns a long way, and the sources do not agree on exactly how far. There are two 60-tooth turntables in the model, this one under the cab and a second joining the front and back halves of the truck.
The machine steers in the middle, like the real thing. The front section turns left or right independently of the back, on the second turntable, and it is driven from a gear dial along the top of the rear section. Adam calls it a limited steer function. Amy’s overhead photo shows the frontmost wheel turning much more than the second wheel, which is what you would expect from a pivot behind the cab. Each axle also rocks back and forth to simulate shocks, so the eight wheels stay on the ground when you push it over a rug.

How the build goes
The parts come in three numbered sections and the sections match the three parts of the machine. Neither reviewer gives a build time. Our member diary lists 3 to 5 hours and that matches the size of the box. The order below is the instruction order, and the important thing to know is that nothing pneumatic works until the very end.
Cab and front section
The build begins with the cab. Amy found it the easiest section and the one where she made fewest mistakes; the undercarriage goes together first, with the turntable that lets the cab rotate and the rocking axles under it. Adam warns that it houses more than it looks like: the cab contains the two air switches, and their hoses run back to the rear section, which is the first fiddly moment (see below). There are small pleasures too, a coffee mug, canteen, shovel and axe clipped around the cab.
Rear body, battery box, steering and wheels
The back end and the base. Adam says this may look complex but it is in fact the easiest section: plates around the battery box, the second turntable joining the two halves, more hose runs tucked away, then the steering and the eight wheels. The rear lid is hinged and a small grey hub on a rod unclips it so you can reach the battery box. At the end of this stage you have a truck you can steer, with hoses going nowhere: the battery box is in but the tubes are not connected to anything yet.
Boom arm and harvester head
The hard part, and both reviewers agree. Adam calls the boom arm the most intricate part of the entire build. Amy found section three the most challenging, did not find the directions as easy to follow, and found the debarking structure at the end of the crane quite complex. Build the head slowly, check each sub-assembly moves before you join it to the next, then connect the cylinders and hoses last. Switch the battery box on and the whole thing comes alive at once.
One member has built this one and sent a photo, and two reviewers wrote their builds up in detail. Between them, these are the points to slow down for.
- Hoses onto the valve connectors. Adam found the tubes a little tight to get onto the valve connectors and a little fiddly. Push them fully home. A hose that is half on will leak, and a leak shows up as a boom that will not hold its height.
- Green panels around the battery switch. Amy had to play with the placement of the outer green panels a few times before the switch that controls the battery box could move forward. Test the switch before you close the rear body up.
- The harvester head hides its mistakes. Amy’s errors in the head were not clear until after the structure was assembled and it was clear it was not working correctly, and she took parts of it apart over and over to find them. Turn every gear and pivot as you add it rather than trusting the last page.
- Nothing works until section three. The battery box goes in during section two but the tubes are not connected to anything yet. Do not spend time hunting for a fault in the pump before the boom exists.
- The logs fall apart. Adam found the brick-built logs a little frail: they have a couple of rods running through them but still come apart really easily. Handle them by the ends, and if a member finds one in pieces in the box, that is why.
On the shelf
Finished, it is 35 cm long, 13 cm wide and 18 cm high on Adam’s measurements, so it takes about as much room as a large shoebox, plus the boom. The buzzsaw logo on the rear tank is a sticker, and Amy left the whole sheet off with no loss, so the stickers are optional. Switch the battery box off between goes; it lives under the hinged rear lid, and the batteries are our job, not yours.

Members who have built it
One Forest Harvester build has come back with a photo so far. The diary is linked under the picture.

This is the one for you if you want to see how a motorised pneumatic system goes together without taking on a 2,000-piece truck. It suits a newcomer too: Amy built it as her first Technic set and finished it. Allow two evenings, keep the hoses and cylinders aside until section three, and turn every part of the harvester head as you build it. If you already know pneumatics and want a long build, it will be over quickly; look at the tow truck below instead.
If you like this one, try
The other forestry machine in the library, the two other pneumatic sets, and the crane that came out in the same 2018 wave.



The Forest Harvester is in the library
Technic Fan gets up to 6 kits a year, Master Builder up to 12. Delivery both ways is included and the prepaid return label is in the box.